Vternal Framework Tutorial
June 2018
Introduction and Overview
The Vternal Framework (VF) is a library of functions which you can include in your IOS or Android Application to give it Vternal capabilities. We called an application which includes the VF - ‘Vternalized’. The VF is nothing to do with Vternal.com or the ’Vternal Timelines’ phone Application (although the phone app uses the VF itself).
Using the VF, added to an application, allows that application to store files in The Vternal Network and it also allows applications to fetch files from The Vternal Network, using their key. The VF also makes applications which use it nodes on The Vternal Network and as such every downloaded ‘Vternalized’ app strengthens and broadens The Vternal Network, to the benefit of everyone.
Two implementations of the VF are currently provided; one for Android and one for IOS. In due course other platforms may be supported, for example a JavaScript version to allow websites to be ‘Vternalized’.
The VF is very lightweight, you can add the library to your application without incurring any noticeable penalty in size or performance. How you use the VF API in your application is up to you; in some ways it is like incorporating maps: it incurs no noticeable overhead; and you can use its features as little or as much as you want. Of course The Vternal Network is nothing to do with maps, but its use is analogous.
Incorporating VF in your application for both Android and iOS is similar:
That’s all there is to it. The registration, download and startup steps should only take a few minutes. Visit https://vternal.com, create an account, login, goto the Framework Tab on the user menu and voila!
Registering your Application
Go to https://vternal.com and login as a Vternal user. If you wish to create an account specifically for your applications you can do so by making sure you are logged out of Vternal and signing up. You can register multiple applications within your Vternal account and you can use that account for any and all the standard vternal.com and Vternal Timeline app features.
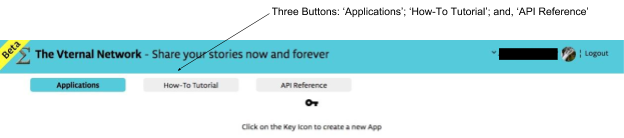
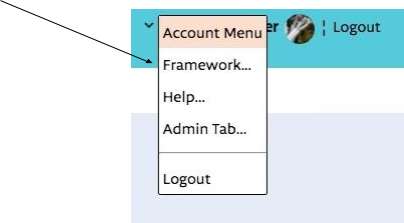
On the Account Menu (top right click on your login name), select ‘Framework…’ Like this:
You will see something like this:
Select the ‘Applications’ button. This is the default.
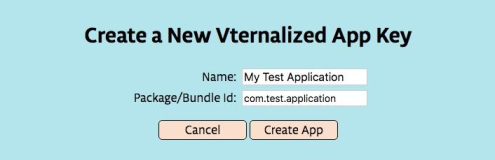
To create a new Application click on the key ( ) image. You will see something like this:
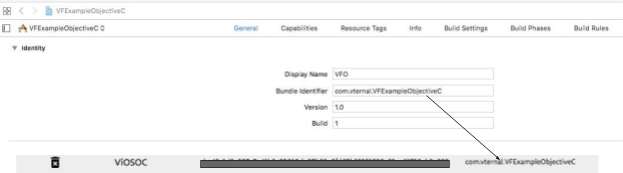
Enter a unique name for your New Application; also enter a Package/Bundle Id. For Android this is the ‘applicationId’, as it appears in the build.gradle file for your app. For iOS, this is the Bundle Identifier for your app., as displayed by Xcode.
Click ‘Create App’ to complete the process. It is important that the Package/Bundle Id’ is correct. Only apps with this value will be able to register with the corresponding key.
Once you have created your Application an entry will appear, something like this:
You can delete your app by clicking on the delete () button next to it. The ‘Key’ can be cut and pasted into your application source code, as explained below. You are now ready to incorporate the Vternal Framework in your Application.
Incorporating the Vternal Framework in your Application
Android
The first step is to download the Vternal Framework .aar. The Android version of VF is downloaded from Here. This downloads vternalframework.aar. Once it is downloaded, save it in a location that is easy to remember. The .aar can be added to all and every application you want to vternalize. The VF requires that your Android application is configured for API Level 23 and above. It will not work with earlier API levels.
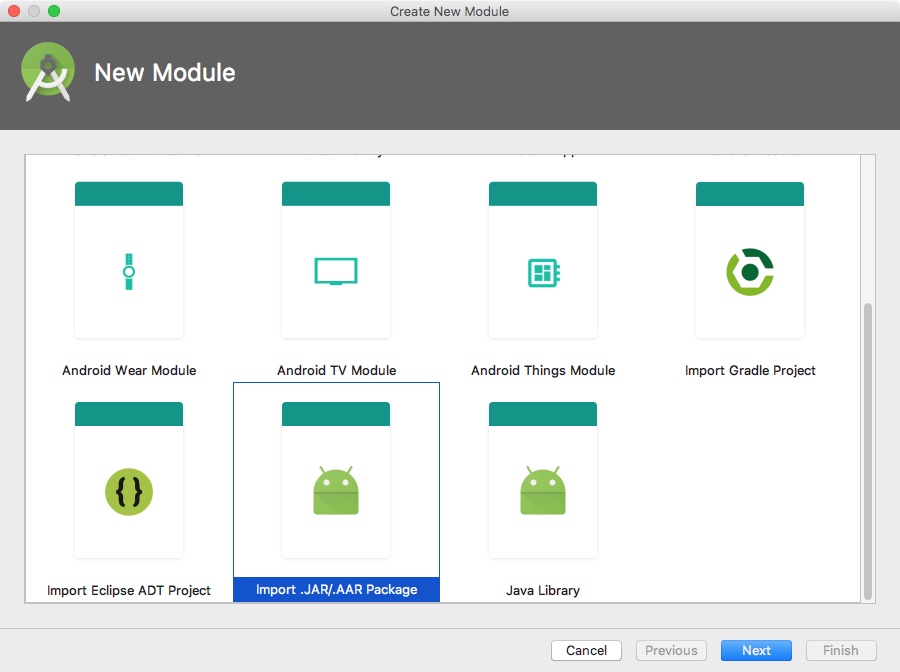
To incorporate the VF in your application, assuming you are using Android Studio, you add the download .aar as a new ‘module’ in your application. To do this select the ‘File->New->New Module’ menu in Android Studio. As Follows:
Scroll down and select the ‘Import .JAR/.AAR Package’ option, the click ‘Next’.
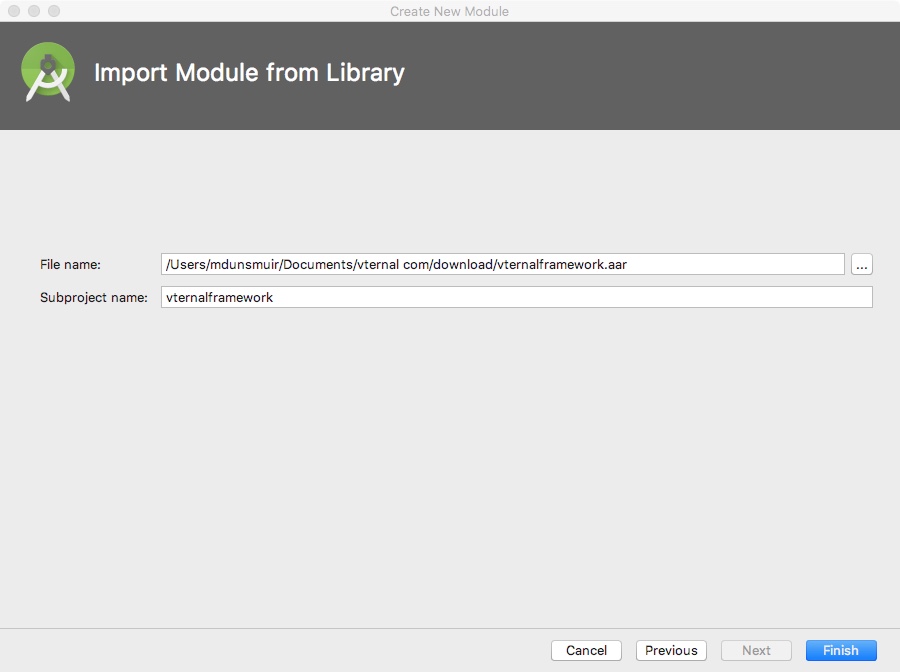
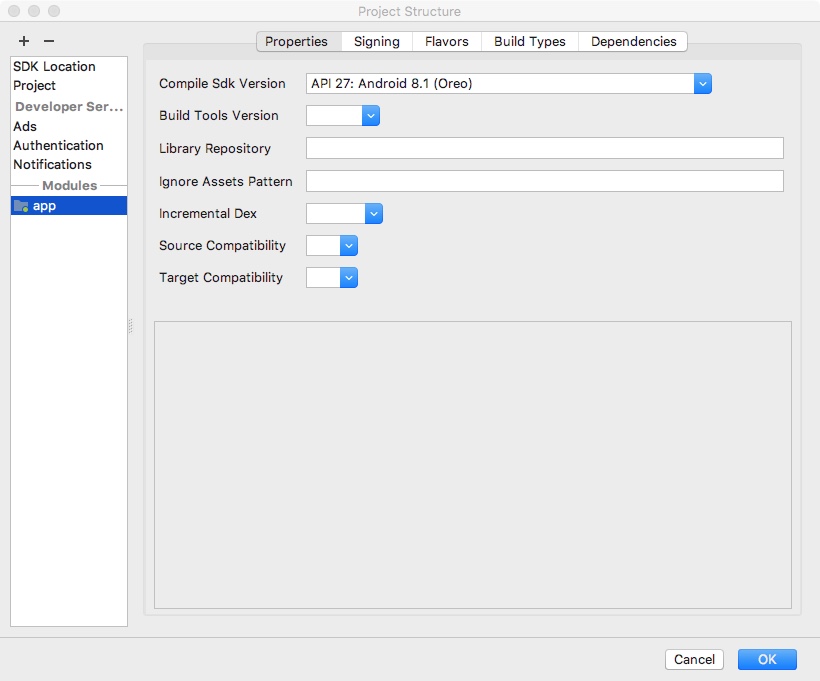
Find the .aar file you downloaded and click ‘Finish’. Apparently nothing will happen, but the final step, which makes the vternalframework appear, is to make your app depend on the module you’ve just imported. To do the select the ‘File->Project Structure…’ menu.
You should see something like this:
Select the main (normally ‘app’) module from the ‘Modules’ list and then select ‘Dependencies’ at top right.
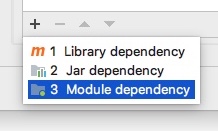
Select the ‘+’ at bottom left and then ‘Module dependency’
A list, including ‘vternalframework’ will appear, Select it and click ‘OK’
Now the module vternalnetwork, after a brief delay to sync. Gradle, will appear in the module list of your application and you are ready to make code changes to use it.
Making changes to your Android code to use the Vternal Framework
There are only one thing left to do to get your application ready to use the Vternal Framework. That is to register your app with Vternal at startup.
A typical code motif for registering with the Vternal Network looks like this:
package com.vternal.vfexample;
...
import com.vternal.android.vternalframework.VternalFramework;
public class MainActivity extends Activity
{
@Override
protected void onCreate(Bundle savedInstanceState)
{
super.onCreate(savedInstanceState);
...
registerWithVternal();
...
}
private void registerWithVternal()
{
VternalFramework.registerApplication(this, "Your Vternal App. Key",
new VternalFramework.VternalRegister()
{
@Override
public void registered(boolean result)
{
// beware: registered may not be called on the main thread
if (result)
{
// successfully registered
...
}
else
{
// registration failed
...
}
}
});
}
,,,
…
}
Registration is an asynchronous process which may take few seconds. You can check the status of the registration by calling vternalframework.isRegistered(). Registration is normally placed, as here, in the onCreate() function of the app’s startup Activity.
Now you should be able to build and run your application and the Vternal Framework should start. Before you do so, however, ensure that you insert the API Key you generated on vternal.com in your code and that the applicationId in your app’s build.gradle file matches the Package you used to create the key on the website.
IOS
The first step is to download the Vternal Framework .zip. The iOS version of VF is downloaded from Here. This downloads the file vternalframework.zip Once it is downloaded unzip it (by clicking on the zip file in the Finder, and save it in a location that is easy to remember. The directory VternalFramework.framework contains all the files which comprise the framework, It should be added to all and every iOS application you want to vternalize. The VF requires that your iOS application is configured for iOS 10.0 and above. It will not work with earlier versions.
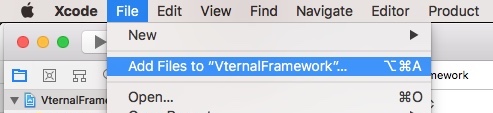
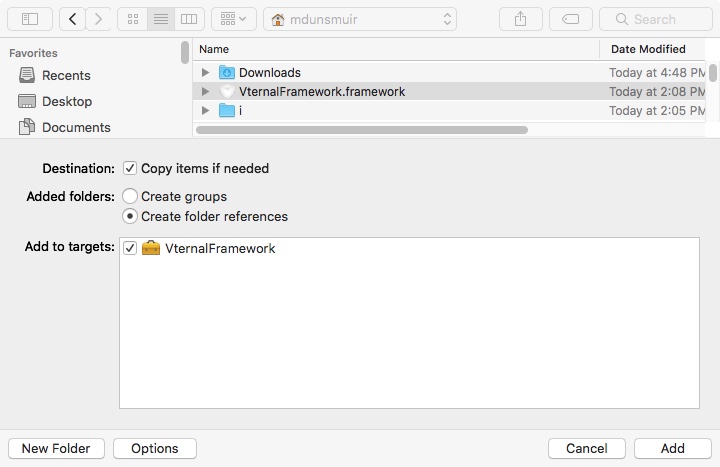
To add the framework to your application add the directory Vternalframework.framework to your iOS source code in Xcode. This is done using Xcode’s ‘File->Add Files to…’ menu.
Be sure to check the box ‘Copy items if needed’.
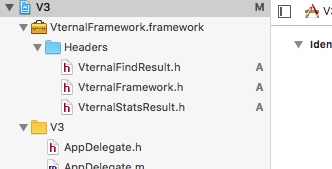
The Framework will appear in your application.
Making changes to your iOS code to use the Vternal Framework
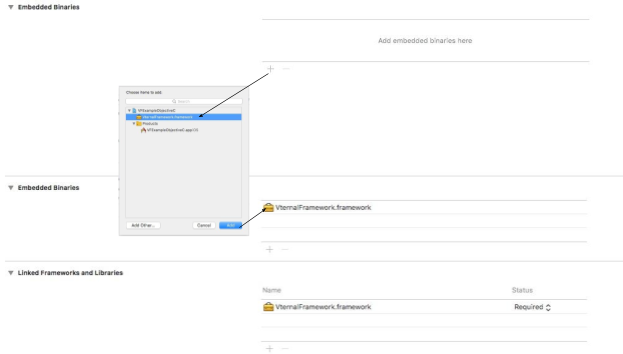
There are a number of things left to do to get your application ready to use the Vternal Framework:
This step is necessary to link the Vternal Framework with your app. Only dynamic frameworks, supplied by Apple, don’t need embedding. Note that the framework is also added to the list of linked frameworks and libraries.I may appear twice in this list. If it does you can safely remove one of the entries. For aesthetic purposes.
#import <VternalFramework/VternalFramework.h>
Or, for Swift
import VternalFramework
- (BOOL)application:(UIApplication *)application didFinishLaunchingWithOptions:(NSDictionary *)launchOptions
{
// Override point for customization after application launch.
[VternalFramework registerApplicationWithKey:
@"<Your Vternal Key>" callback:^(BOOL registered){
if( registered )
{
NSLog(@"Registered for %@",
[[NSBundle mainBundle] bundleIdentifier] );
}
else
{
NSLog(@"Failed to register for %@",
[[NSBundle mainBundle] bundleIdentifier] );
}
}];
return YES;
}
Or in Swift:
func application(_ application: UIApplication,
didFinishLaunchingWithOptions
launchOptions: [UIApplicationLaunchOptionsKey: Any]?) -> Bool
{
// Override point for customization after application launch.
VternalFramework.registerApplication(withKey:
"<Your Vternal Key>" ,
callback: {(registered: Bool) -> () in
if registered {
print("Registered for
\(Bundle.main.bundleIdentifier!) ");
}
else {
print("Failed to Register for
\(Bundle.main.bundleIdentifier!) ");
}
})
return true
}
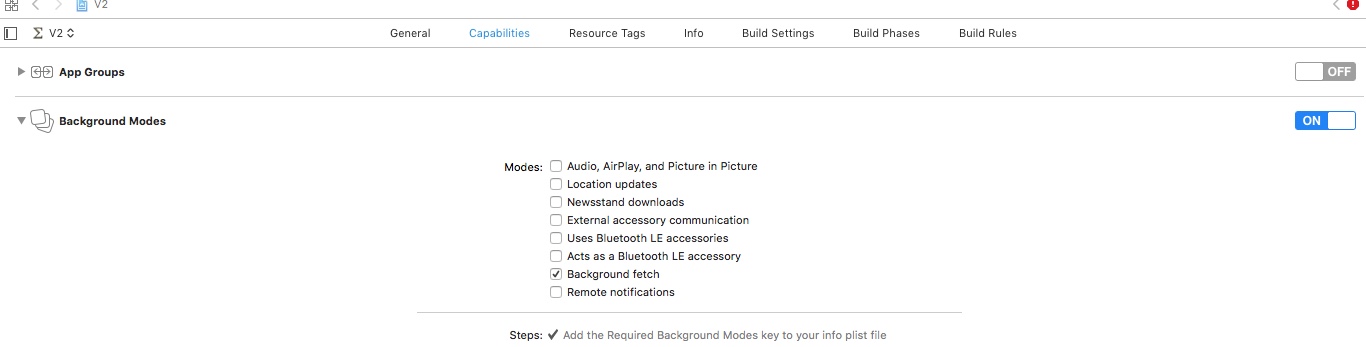
-(void)application:(UIApplication *)application
performFetchWithCompletionHandler:
(void (^)(UIBackgroundFetchResult))completionHandler
{
long timeTaken = [VternalFramework conjugate];
completionHandler(UIBackgroundFetchResultNewData);
}
If you are using Swift, then the corresponding Swift code should be added.
func application(_ application: UIApplication,
performFetchWithCompletionHandler completionHandler:
@escaping (UIBackgroundFetchResult) -> Void)
{
let timeTaken = VternalFramework.conjugate()
completionHandler(UIBackgroundFetchResultNewData);
}
Now you should be able to build and run your application and the Vternal Framework should start. Before you do so, however, ensure that you insert the API Key you generated on vternal.com in your code and that the Bundle Id in your app’s configuration matches the Bundle Id you used to create the key on the website.
Uploading an App., using the Vternal Framework, to the App. Store
Recently Apple have made a number of changes to the application upload process. Whilst it has been common practice to include support for the Intel architecture in downloaded static frameworks, such as the Vternal Framework, to allow the framework to be used with both devices and the simulator; the upload process now gives an error if the Intel version of the framework is uploaded to iTunesConnect. This means that everything will work great until you attempt to upload your completed application.
To get around this problem and to make the process as seamless as possible you can add a shell script to the build process to get rid of unwanted architectures from the framework library. This step is not strictly necessary during the development process but is absolutely necessary when you come to upload to iTunesConnect.
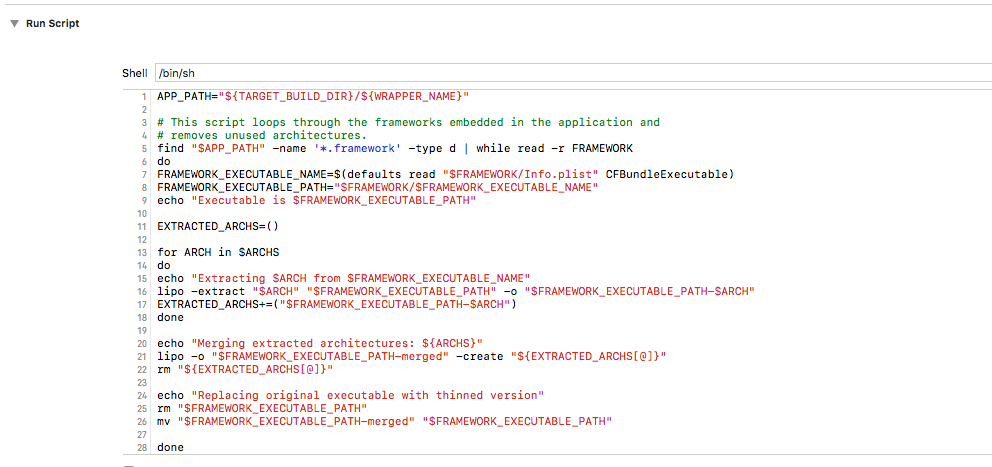
Add the script to the ‘Build Phases’ section of your target under ‘Run Script’. If you already have such a script then make sure the following magic is present there; otherwise just add it.
APP_PATH="${TARGET_BUILD_DIR}/${WRAPPER_NAME}"
# This script loops through the frameworks embedded in the application and
# removes unused architectures.
find "$APP_PATH" -name '*.framework' -type d | while read -r FRAMEWORK
do
FRAMEWORK_EXECUTABLE_NAME=$(defaults read "$FRAMEWORK/Info.plist" CFBundleExecutable)
FRAMEWORK_EXECUTABLE_PATH="$FRAMEWORK/$FRAMEWORK_EXECUTABLE_NAME"
echo "Executable is $FRAMEWORK_EXECUTABLE_PATH"
EXTRACTED_ARCHS=()
for ARCH in $ARCHS
Do
echo "Extracting $ARCH from $FRAMEWORK_EXECUTABLE_NAME"
lipo -extract "$ARCH" "$FRAMEWORK_EXECUTABLE_PATH" -o "$FRAMEWORK_EXECUTABLE_PATH-$ARCH"
EXTRACTED_ARCHS+=("$FRAMEWORK_EXECUTABLE_PATH-$ARCH")
done
echo "Merging extracted architectures: ${ARCHS}"
lipo -o "$FRAMEWORK_EXECUTABLE_PATH-merged" -create "${EXTRACTED_ARCHS[@]}"
rm "${EXTRACTED_ARCHS[@]}"
echo "Replacing original executable with thinned version"
rm "$FRAMEWORK_EXECUTABLE_PATH"
mv "$FRAMEWORK_EXECUTABLE_PATH-merged" "$FRAMEWORK_EXECUTABLE_PATH"
done
In Xcode it looks like this:
Then, when you build for the App. Store, everything will be well and unwanted architectures will be stripped from the binary created.
Under the Covers: How the Vternal Framework Operates
Before you go ahead and incorporate the Vternal Framework API into your Application it is important to understand how The Vternal Network is structured and how it operates. Here are some key points:
‘finalPath’ now contains the full pathname of the retrieved file.
Security is an inherent, statistical, result of the manner in which The Vternal Network breaks files into multiple assets and stores these assets, anonymously, on many, randomly chosen, nodes. Nevertheless, those wanting an extra level of security can obtain it by first encrypting files before they are stored; but the downside of this is that additional decryption keys must be kept somewhere.
To add an extra level of security, assets are encrypted when they are stored locally, so even a part of a file stored originally in plain text, cannot easily be seen or recovered by the owner of the device it is stored on. Besides, since files are broken into pieces and the pieces scattered randomly, the prospects of assembling a file by brute force is essentially zero. Furthermore, since assets are never stored in plaintext their type cannot be easily be determined. Generally speaking then, assets are only available as plaintext at the endpoints of storing and retrieval; to get there requires the right key.
Using Vternal Framework API in your Application
Once your application is registered with vternal and the framework is enabled you can use the VternalFramework API to add Vternal features to your app. The API features are similar, but not identical, between iOS, Swift and Android: